This year, I'm taking up a new challenge! I signed up to take a Machines and Tools class at my school and I can already say that it's really cool. My teacher Mr. G gave us a really interesting first assignment. He introduced my class to the invention of the first battery made out of copper and zinc!
Question: What's a penny battery?

Kelly: Basically it's a battery made out pennies!
For my class's first project was to make a penny battery with enough volts to power an LED Light.
Question: How does it work??

Question: What is voltage?
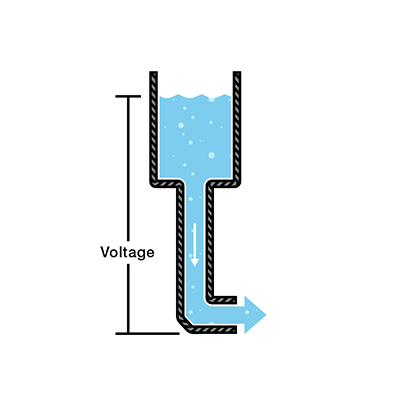
(Picture from sparkfun.com)
Link to their page where they go more in depth about the science of electricity
https://learn.sparkfun.com/tutorials/voltage-current-resistance-and-ohms-law
Kelly: Voltage or volts, is the amount of potential energy between two points on a circuit. The difference in charge between the two points on a circuit is called voltage. A better way to see this is by looking at this picture of a water tank. The white arrow which is the flow of the water represents the current. and the voltage is the pressure that is forcing water through the thinner tube part of the tank.
Question: Wow that's cool! So what do you need to make a penny battery?

Kelly: Well for starters you'll need some pennies, zinc, cardboard, aluminum foil, and LED light, and salt water solution. You can use any type you'd like. You have the options of lemon juice, vinegar and salt, or even soy sauce. Or you can simply just have water and salt well combined.
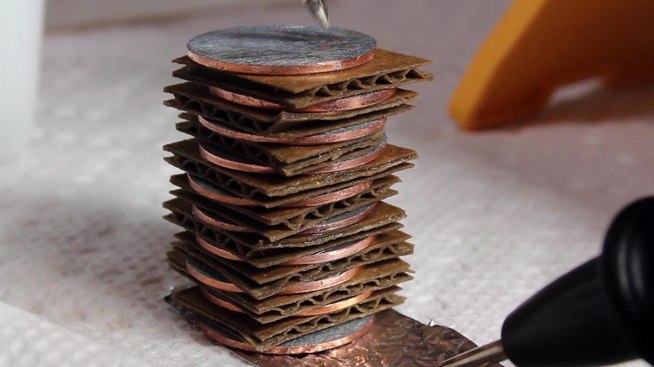
Question: So how do you make it??

(Side Note: Make sure the pieces of cardboard are not touching with one another or else the battery will not work)
Question: Did it end up working?


Kelly: Surprisingly yes. I couldn't believe it when I saw the LED lighting up with my own eyes.
Question: So then what did you do?

Kelly: The next step was level 2 which was to make a series circuit with the penny battery, the LED, and a new item, a light switch. And I was also able to figure out the wiring and find out what connects with what.
Question: And that's it?

Kelly: Not just yet. I had one more level to go. In my next assignment, I had to create a container that holds two battery that will light up two LEDs, the box must survive a five feet drop, and the batteries had to be replaceable. But first, I had to make a schematic of my assignment.
Question: Woah. And was this assignment harder?

Kelly: Of course it was. It was mostly figuring out how to make the battery replaceable. So I started looking for things lying around and I happened to find an old glasses case and some clothespin. Then the idea hit me and I knew what to do.
Question: So how did you construct everything altogether?


Kelly: First off, I had to get some new supplies. For example I had to make two new batteries since the last one rusted due to oxidation to the zinc and vinegar. I also found some toys lying around that I knew could come in handy plus I bought two extra LEDs. Now I have to put all the pieces together.
Question: So how did it turn out?


Kelly: It turned out great! The all of the components ended up working perfectly with each other. With the clothespins opening and closing, I'm able to replace the batteries.
So cool! How did you make the short video (gif)?
ReplyDeleteIt was a bit tricky at first. I first recorded a video of the LED being turned on and off. Then I went to the App Store and searched "gif maker" and it converts the clip into a gif and you can customize the length of the clip. Hope this helps!
Delete